Thursday, November 19, 2009

Snowman Button Card

Well it has been a while... Today I am showing you another card that I have been working on - i was inspired by a stamp set that is obviously not Stampin' Up! (and as you know I can't say the name). I love buttons and have many many colour coded containers full of them. I wanted to incorporate buttons into one of the stamp sets and I used the punch pals stamp set and the snowman.


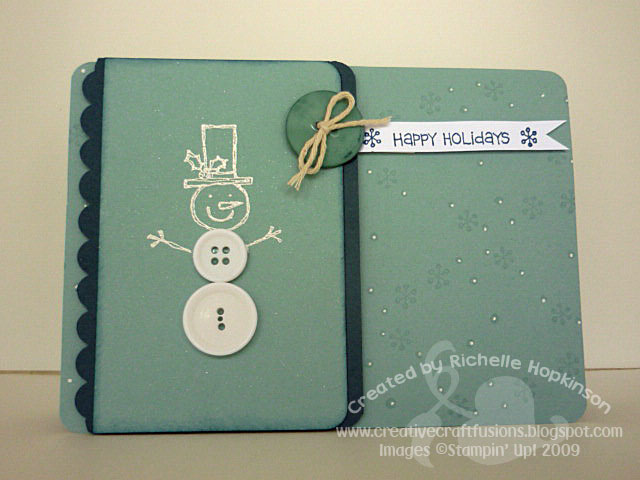
Thought he was very cute. I embossed him to allow a little bit of extra depth on the card.
Stamp: punch pals
Card: not quite navy; baja breeze; whisper white
Punches: corner rounder; scallop edge
Others: buttons; twine; white embossing powder

Tuesday, November 10, 2009

Elf Shoes CARD

Sorry that I haven't posted for a while - been busy making swaps for our upcoming Stampin' Up! regionals at the end of this month. Between doing this and looking after my 9 month year old - leaves not much time or energy for craft! But I have managed to make a few cards which I will show over the next week. There is punch art but also a couple of other cards which I have been wanting to make for a long time.

This card was cased from Marie Shaughnessy. I wanted to make this for a while but here in Australia we don't really celebrate Halloween, so instead I thought it would make a great elf shoe card. The directions for this card can be found on her blog - I obviously just changed the colours etc.

Let me know what you think.. Feel free to email me with any questions.


Monday, November 2, 2009

Penguin Candy Cane Holder Part II

For those who are visiting my blog for the first time, these are more detailed instructions for the penguin candy cane holder that I posted here.

I have given instructions on how to make the body and the "arms" for the penguin. I have used green on blue card so you can see the arms and position alot clearer. The photo in my previous post was a little hard to exactly see how the arms were positioned.

For the head I used Kim's instructions
here. For the arms I used the butterfly punch and cut this as shown in this photo. I then used an oval die (my oval was approx. 6.5cm (l) x 4.8cm (w)). I punched the slits using the slit punch. I have also drawn the position of the slit punch on the diagram below.


I then glued the arms behind the head as shown . HINT - I would suggest using extremely strong adhesive when joining the arms to the head as this piece will be subjected to slight bending . I used 2 way glue pen and it wasn't enough - possibly sticky strip?


Place candy cane in the slots that were made on the oval first. Then attach the head/arm piece to the body. This will ensure good placement so that the hands look like they are almost holding the candy cane. I used dimensionals to adhere the body/arm piece to the body.

Finish decorating as desired. I finished the tummy with a heart form the heart-to-heart punch.

Christmas Extravaganza

Make Stampin' Up! your one stop shop for all your gift giving ideas this Christmas.

Need cards, presents, scrapbooking ideas for family, friends, neighbours or even your kids' teachers??

Stampin' Up! has the answers. From the 1st November to 14th December 2009 , you can get a FREE scallop square punch when you spend $85 on products from this Stampin' Up! gift giving guide here.

Email me if you would like to order products from this guide and get your FREE scallop square punch.

Sunday, November 1, 2009

Watch This Space!!

Hi everyone
Just a quick post, to let everyone know that I will be posting a few more directions/instructions for the body of the Penguin candy cane holder - after the many requests.. I am currently away so I will post these directions early-mid next week.